
Practical Garden Guide
Soaker Hose vs Drip Irrigation: Which Fits Your Garden?
Compare the complete watering layout—not just the line at the soil surface—to decide which system fits your beds, containers and maintenance routine.
By Gardening Is Ezee EditorsUpdated 16 min read
A soaker hose is often the simpler choice for one compact, fairly level bed. Drip irrigation is usually the more adaptable choice when you need to water several beds, individual containers, or plants with different spacing. The best option depends less on which system sounds more advanced and more on where water needs to go, how your garden is arranged, and how much adjustment you are willing to do.
Both approaches put water near the soil instead of sending it across the garden through a sprinkler. That does not make either one automatically efficient. A line watering an empty path, a timer running after rain, or an emitter missing a transplant can waste water while the plant stays thirsty. Start with the garden layout, then choose the equipment.
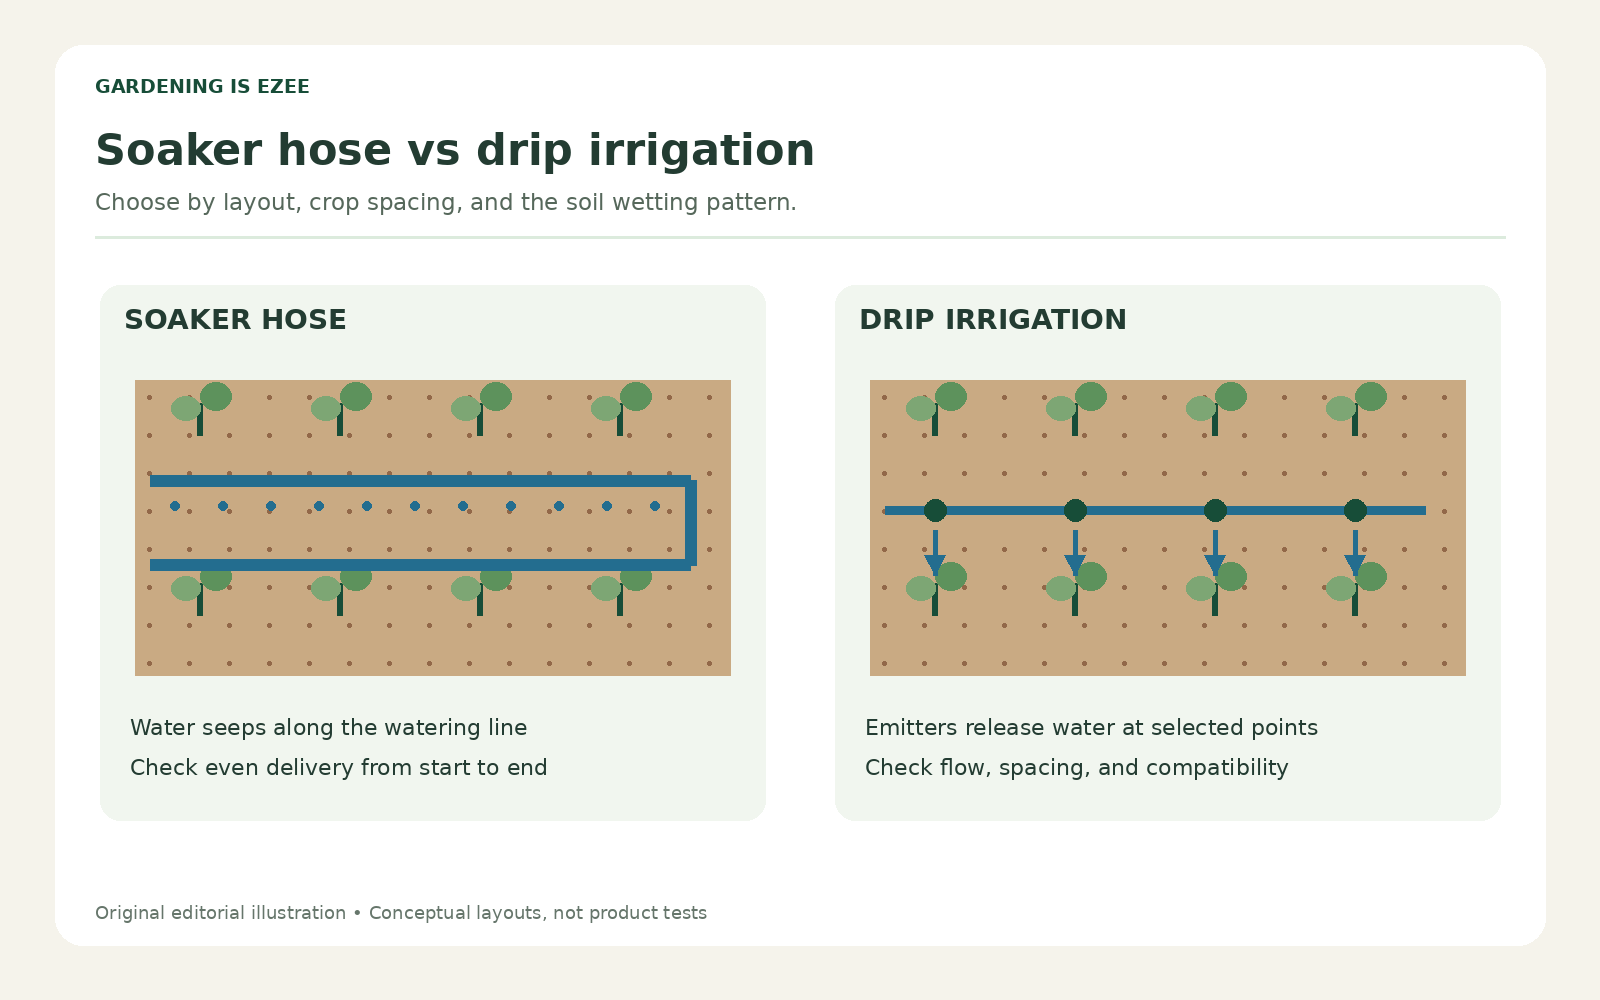
Illustration: Gardening Is Ezee. The layouts are conceptual; line spacing must be tested in your soil.
The quick decision
| Your situation | Start by considering | What to verify |
|---|---|---|
| One small, level vegetable bed | Soaker hose | Even wetting from the start to the end |
| Several beds separated by paths | Drip irrigation | Mainline capacity and separate bed connections |
| Pots scattered around a patio | Individual drip emitters | Each pot receives enough water without overflowing |
| Closely spaced rows | Inline drip tubing or soaker hose | Wetting overlaps between plants |
| Sloping planting area | Suitable pressure-compensating drip equipment | Manufacturer pressure and elevation limits |
| Temporary seasonal layout | Simple soaker setup | Easy removal and storage |
These are starting points, not fixed rules. A well-installed soaker hose can outperform a poorly planned drip system. A small drip kit may also be easier to manage than an oversized hose that refuses to fit the bed.
How a soaker hose works
A soaker hose releases water along its watering length through a porous wall or a permeable outer structure. You lay it in or beside the planting area, connect it to the supply, and let it wet the soil around the hose. Some products are round and rubber-like; others flatten when empty. Their installation requirements differ, so use the instructions for the exact product.
The main attraction is the small number of decisions. You do not normally have to install an individual outlet beside every plant. For a row of similar vegetables, a line can follow the row. For a compact flower bed, a loose curve can pass through the planting area. Keep bends broad enough to avoid pinching the hose.
The trade-off is that water comes out along the watering section whether or not every part of that section needs it. If the hose crosses an unplanted walkway, that section can still release water. Connect separate watering sections with nonporous supply hose rather than spending water on the path.
How drip irrigation works
Drip irrigation carries water through distribution tubing and releases it through emitters. The emitters may be built into tubing at regular intervals or attached individually where plants need water. Supply tubing moves water; emitters decide where it exits. Understanding that distinction makes the system much easier to plan.
An inline dripline can serve evenly spaced vegetables. Individual emitters can serve containers or plants with irregular spacing. A main supply line can follow a path, with branches entering several beds. That flexibility is useful when the garden is not a single rectangle.
More flexibility also means more connections and specifications to check. Tubing sizes that look alike may use different fittings. An emitter has a rated flow and an operating pressure range. A regulator, filter, and suitable backflow protection may be part of the installation. Colorado State University Extension identifies missing filtration or pressure reduction and excessive line lengths among common home drip setup mistakes in its drip irrigation guide.
Compare the whole installation, not just the hose price
A cheap watering line is not a complete system. List the components between the faucet and the plants before comparing costs. Depending on the product, you may need a supply hose, timer, regulator, connectors, stakes, filter, end closures, and backflow equipment. A kit might include some of those items and omit others.
For a single bed, the extra fittings in a drip kit may add little practical value. For four beds, using supply tubing between beds can be more orderly than stretching porous hose across every gap. The useful comparison is the cost of an installation that actually reaches all the planting areas.
Include maintenance purchases too. Replacement washers are inexpensive, but proprietary connectors can be inconvenient to find. A system with locally available fittings may be easier to repair during a hot week. Keep the model numbers and tubing dimensions in a note rather than relying on appearance when ordering spares.
Soil decides how wide the watered area becomes

Drip irrigation in a community garden helps deliver water close to cultivated rows. Photo: USAID in Africa, Public domain via Wikimedia Commons.

Water does not necessarily spread sideways the same distance in every garden. A planting mix with coarse particles can behave differently from a finer soil. Dryness, compaction, and the way the bed was filled also influence what you observe. The visible wet strip on the surface is only a clue; roots live below it.
Run a short trial before fastening everything permanently. After watering, use a small trowel to check moisture beside and between lines without disturbing roots. If narrow wet strips leave large dry spaces, changing line placement may help more than simply increasing runtime. Longer watering can send water deeper while still failing to cover the desired width.
Repeat the test in more than one location. The first section of a bed might contain a different mix from the far corner. A consistent-looking installation can produce uneven results if the growing medium varies. Record what happens instead of assuming a layout from another garden will transfer exactly to yours.
Flat beds, slopes, and pressure
A level bed is generally easier to evaluate because the hose route has fewer elevation changes. On a slope, you need to consider how pressure and drainage affect the watering pattern. Do not assume a standard porous hose or basic emitter delivers the same amount everywhere simply because the faucet is on.
Pressure-compensating emitters are designed to moderate output within a stated range, but the label does not remove all design limits. Too little inlet pressure, excessive demand, unsuitable tubing, or a steep installation can still produce poor results. Verify the operating conditions rather than treating the phrase as a guarantee.
Before purchasing, describe the slope and route to the manufacturer if the manual does not address them. It is better to ask whether a product fits the actual installation than to buy first and try to correct uneven watering with an increasingly long timer setting.
Which system fits raised beds?
For one raised bed with closely spaced vegetables, both systems can work. A soaker hose is appealing when you want a simple seasonal line. Inline drip tubing is appealing when you want parallel runs connected to a supply header. Neither arrangement should be designed from bed dimensions alone; crop spacing matters too.
For several beds, separate watering branches make inspection and changes easier. Imagine replacing lettuce in one bed with widely spaced tomatoes. An individual branch gives you options without dismantling everything. You can reroute a line, change the bed arrangement, or isolate that branch while working.
Keep the supply route outside the main digging area where possible. A line crossing the middle of a bed is easy to catch with a fork. Mark where tubing enters and exits, particularly if mulch hides it. Take a photograph before covering the system so you have a useful reference later.
Which system fits containers?
Containers usually favor individual delivery because a porous hose can release water between pots. A small branch can reach each container while the supply tubing stays along the patio edge. That does not mean every pot should get the same emitter or share the same schedule.
A large container in afternoon sun and a small shaded herb pot may dry at different rates. Grouping pots by similar watering needs can simplify the system. If you cannot group them, adjustable delivery or separate zones may be worth considering. Check the potting mix after a cycle rather than judging by the presence of a drip.
Leave room for maintenance. Emitters should be reachable, and tubing should not pull tightly against pot rims. A hanging basket may move in wind or be lowered for care. Plan slack and secure the route so a normal adjustment does not pull a fitting loose.
Watering schedules: use observations before automation
A timer repeats a schedule; it does not know whether that schedule fits your soil unless suitable sensing and controls are part of the system. Begin with supervised watering. Check moisture before the cycle, observe delivery during it, and check the soil afterward. Adjust one variable at a time.
Do not borrow a universal instruction such as running every system for twenty minutes daily. Emitter flow, planted area, rainfall, growing medium, plant size, and weather all affect the result. Two systems running for the same time can deliver very different amounts of water.
Use Gardening Is Ezee's watering timer comparisons after you understand the schedule you need. Useful features include a clear manual control, a practical rain-delay function, and programming you can review without guessing. More settings are only helpful if you can use them reliably.
Maintenance: what you will actually inspect
With a soaker hose, look for sections that stay unexpectedly dry, local sprays suggesting damage, leaks at connectors, and pinched curves. Inspect the entire run while it operates. A hose hidden under mulch can keep leaking long after you stop noticing the surface.
With drip, inspect emitters and connections, clean filtration as instructed, and check the ends of branches. A single blocked outlet may affect one plant while everything else appears normal. This is one reason a quick walk around the garden remains useful even with automation.
Make a small repair kit suited to the system rather than buying miscellaneous parts. Label spare emitters by flow, keep matching connectors together, and store the installation instructions. A repair becomes much easier when you know which part you are replacing and why.
Seasonal setup and storage
At the start of the season, connect and test the system before plants make access difficult. Open ends for flushing only where the instructions allow it, then close them securely. Check for damage from storage, animals, or previous gardening work. Test the timer separately before relying on its schedule.
Before freezing weather, follow the product's winterization instructions. Some parts should be removed and stored, while other tubing may remain in place under specified conditions. Do not improvise with compressed air unless the manufacturer describes a safe method and pressure limit.
Photograph the working layout and label disconnected branches. Store delicate parts where they will not be crushed. Spring installation is faster when you can identify which line belonged to which bed, instead of sorting a pile of anonymous tubing and fittings.
Three realistic garden scenarios
A single vegetable bed beside the faucet
You have a compact bed, a nearby faucet, and a changing assortment of seasonal vegetables. Start by sketching the planted rows. A short soaker hose may be enough if it wets the roots evenly. A small inline drip kit is also reasonable if the row spacing matches the tubing arrangement.
Do not choose drip solely because it sounds more professional. Ask whether its extra parts solve a problem you actually have. If moving one hose at planting time is easier than modifying several branches, simplicity may be the stronger benefit.
Four beds with paths between them
You want the paths to stay dry and the beds to receive targeted water. A mainline with branches into each bed gives a clear layout. Separate branch valves can make testing easier if the components support them and the system is sized correctly.
Calculate the total demand before opening every branch at once. If the source cannot support the combined flow, divide the garden into zones rather than compensating with a longer run. A far bed that receives too little water may have a supply problem, not a scheduling problem.
A patio with mixed containers
You have tomatoes, herbs, and flowering pots with different sizes and exposures. Individual emitters offer more placement control than a soaker hose stretched around the patio. Begin by grouping containers with similar needs, then choose delivery for each group.
The important test is whether each root zone receives enough water without unnecessary runoff. A system that produces visible drips everywhere can still water poorly. Watch a full cycle before leaving it unattended and check drainage afterward.
A buying checklist that prevents mismatched parts
Write down the supply connection, planted area, elevation changes, required watering sections, and the likely expansion plan. Then check the exact tubing size and compatible fitting family. The nominal diameter printed on the packet may not tell you everything needed for compatibility.
Look for clear instructions covering pressure, maximum runs, emitter output, filtration, and maintenance. If a kit lists a plant count, check the assumptions behind that count. Six small pots and six large containers are not automatically equivalent watering jobs.
Avoid buying a huge kit merely because it includes many pieces. You need enough appropriate components, not the largest piece count. A smaller complete system with usable instructions can be better value than a box of mismatched fittings you have to replace.
Frequently asked questions
Can I connect a soaker hose to a timer?
Often yes, provided the timer, hose, pressure control, and supply conditions are compatible. Check both manuals. Test opening and closing with the complete installation connected. A timer that works with an ordinary hose is not automatically suitable for every low-flow system or gravity-fed supply.
Can soaker hose and drip irrigation share a faucet?
They can sometimes use the same source through separate compatible branches. Sharing a faucet is different from sharing one watering zone. If the two branches need different pressures or schedules, give them appropriate controls rather than treating them as interchangeable outlets.
Does drip always save more water?
No useful percentage applies to every garden. Placement, leaks, irrigation timing, rainfall response, and maintenance matter. Drip can deliver water precisely, but a poorly adjusted system can still overwater. Compare the amount needed to keep the intended root zones adequately moist, not the label on the box.
Can I put either system under mulch?
Many garden installations place watering lines at the soil surface beneath mulch, but follow product guidance. Keep the layout accessible enough to inspect and repair. Check actual wetting before covering the lines, then check again after mulching because visibility is reduced.
Which is easier for a beginner?
For a single compact bed, a soaker hose often involves fewer assembly decisions. For scattered containers, a well-documented drip kit may be easier because it matches the job. Beginner-friendly equipment has instructions, compatible parts, and a layout you can understand when something stops working.
What to do before ordering
Spend one watering session observing your existing garden. Note which plants dry first, how far the faucet is from the planting areas, and where a line would cross a path. That information will tell you more than a general claim that one system is better.
Choose the simplest arrangement that delivers water where it belongs and allows you to inspect it. Expand only after that arrangement works. If you want a walkthrough for multiple beds, read How to Set Up Drip Irrigation for Raised Beds. For supply-hose decisions, see How to Choose a Garden Hose.
How to compare watering performance without a laboratory
You can make a useful home comparison by keeping the question narrow. Instead of trying to prove which technology is universally best, ask whether the installation wets your particular planted area adequately. Choose a representative section, use the same source, and record the setup clearly. The result will be a garden observation, not a controlled product test.
Before a trial, note recent rain and starting moisture. Comparing a soaker hose in an already damp bed with drip tubing in a dry bed will not tell you much. If conditions differ, record the difference and avoid turning the result into a broad performance claim. Your notes should help you adjust the system, not produce a dramatic winner.
During operation, observe the first, middle, and last part of the watering route. Look for unexpected sprays, dry segments, or water outside the planting area. After the cycle, check several points in the soil at comparable depths where you can do so without damaging roots. Draw the wetting pattern on the garden sketch.
If you change placement, keep the runtime the same for the next reasonable comparison. If you change runtime, keep the placement unchanged. This makes the result easier to interpret. Changing both simultaneously can improve the bed, but you will not know which change mattered or whether one created a new problem.
A simple log might contain the date, source arrangement, line layout, runtime, weather, and observations at three checkpoints. You do not need expensive monitoring to make the installation more understandable. A consistent method is more useful than a precise-looking number recorded under inconsistent conditions.
Designing for next season's crops
Seasonal flexibility deserves attention before you settle on a watering technology. A bed planted in straight rows this spring might hold widely spaced squash next summer. A fixed arrangement that works beautifully for the first crop may require adjustment later. Ask which parts of the system are easy to reposition and which should remain as the supply backbone.
Keep the main supply outside the area that changes most often. Then use replaceable or movable watering sections inside each bed. This approach can work with either technology when the components support it. The purpose is to separate a stable route from a changing crop pattern, not to create more fittings than the garden needs.
Store the unused parts deliberately. Label short hose sections, emitters, plugs, and connectors so you can find compatible pieces next season. Keep a small diagram showing where the original branches connected. You can then alter one bed without treating the whole system as a new project.
Consider household handover too. If another person waters while you travel, give them a clear diagram and a simple inspection routine. Identify the faucet shutoff and any manual controls. An understandable soaker layout may be preferable to a flexible drip installation that only its builder can operate. Conversely, a clearly labeled drip network can be easier than moving a hose among several beds.
Before expanding, test the existing installation after any crop change. Do not assume an extra bed can share the same zone because the supply tubing reaches it. Check the system capacity and whether the new bed should receive the same schedule. Expansion should preserve reliable delivery to the original beds rather than quietly reducing performance everywhere.
Finally, plan an occasional hand-watering option. New seedlings, unusual dry pockets, or a temporary repair may need targeted attention. Keeping a practical hose or watering can available does not undermine automation. It gives you a simple way to respond while you inspect and adjust the main installation.
Keep watering controls understandable
If the installation has several controls, label what each one does. A source valve, branch valve, timer, and pressure regulator are not interchangeable. A helper should know which control stops the water and which changes a watering zone. Do not assume they can identify the function from the component's appearance.
Keep a short operating note near the garden record. Describe normal operation, the inspection route, and the response to an obvious leak. Include which parts should not be adjusted casually. This protects the useful settings you established through testing.
After a repair, compare the layout with the record and update it. A temporary connector or rerouted branch can become permanent without being documented. The next person may then follow an old diagram and inspect the wrong location. An accurate simple record is better than a detailed outdated one.
When you change the watering technology, preserve the observations about the garden. The soil's wetting behavior, difficult corners, crop needs, and source limitations remain relevant. A different hose or emitter system should solve a defined problem using that information, rather than restart the decision from marketing claims alone.
Sources and further reading
- Colorado State University Extension: Drip Irrigation for Home Gardens — system components and design considerations.
- Colorado State University Extension: Irrigating the Vegetable Garden — watering approaches for vegetables.
- Rain Bird: Landscape & Garden Drip Watering Kit manual — an example of a manufacturer-specific assembly guide; its specifications do not apply to every system.
Editorial method: This guide combines cited technical references with original planning examples and purchasing advice. It does not report hands-on product testing. The examples describe hypothetical gardens.