
Practical Garden Guide
How to Set Up Drip Irrigation for Raised Beds
Plan the source, zones and wetting pattern on paper before buying fittings or fastening tubing inside the beds.
By Gardening Is Ezee EditorsUpdated 16 min read
To set up drip irrigation for raised beds, map the beds and water source, choose compatible supply tubing and emitters, install the required faucet components, flush the lines, and test coverage before setting an automatic schedule. The important part is not getting water to drip somewhere in the bed. It is getting enough water to the intended root zones without leaks, dry gaps, or unnecessary runoff.
A small kit can simplify a first installation, but it must fit your layout and source conditions. A kit advertised for several plants does not necessarily fit several large beds. Read its maximum tubing length, flow limits, pressure requirements, and expansion instructions before cutting anything.
This walkthrough describes a planning and installation sequence for a small home garden. Component order, fitting methods, pressure settings, and backflow requirements must follow the exact product instructions and applicable local requirements.
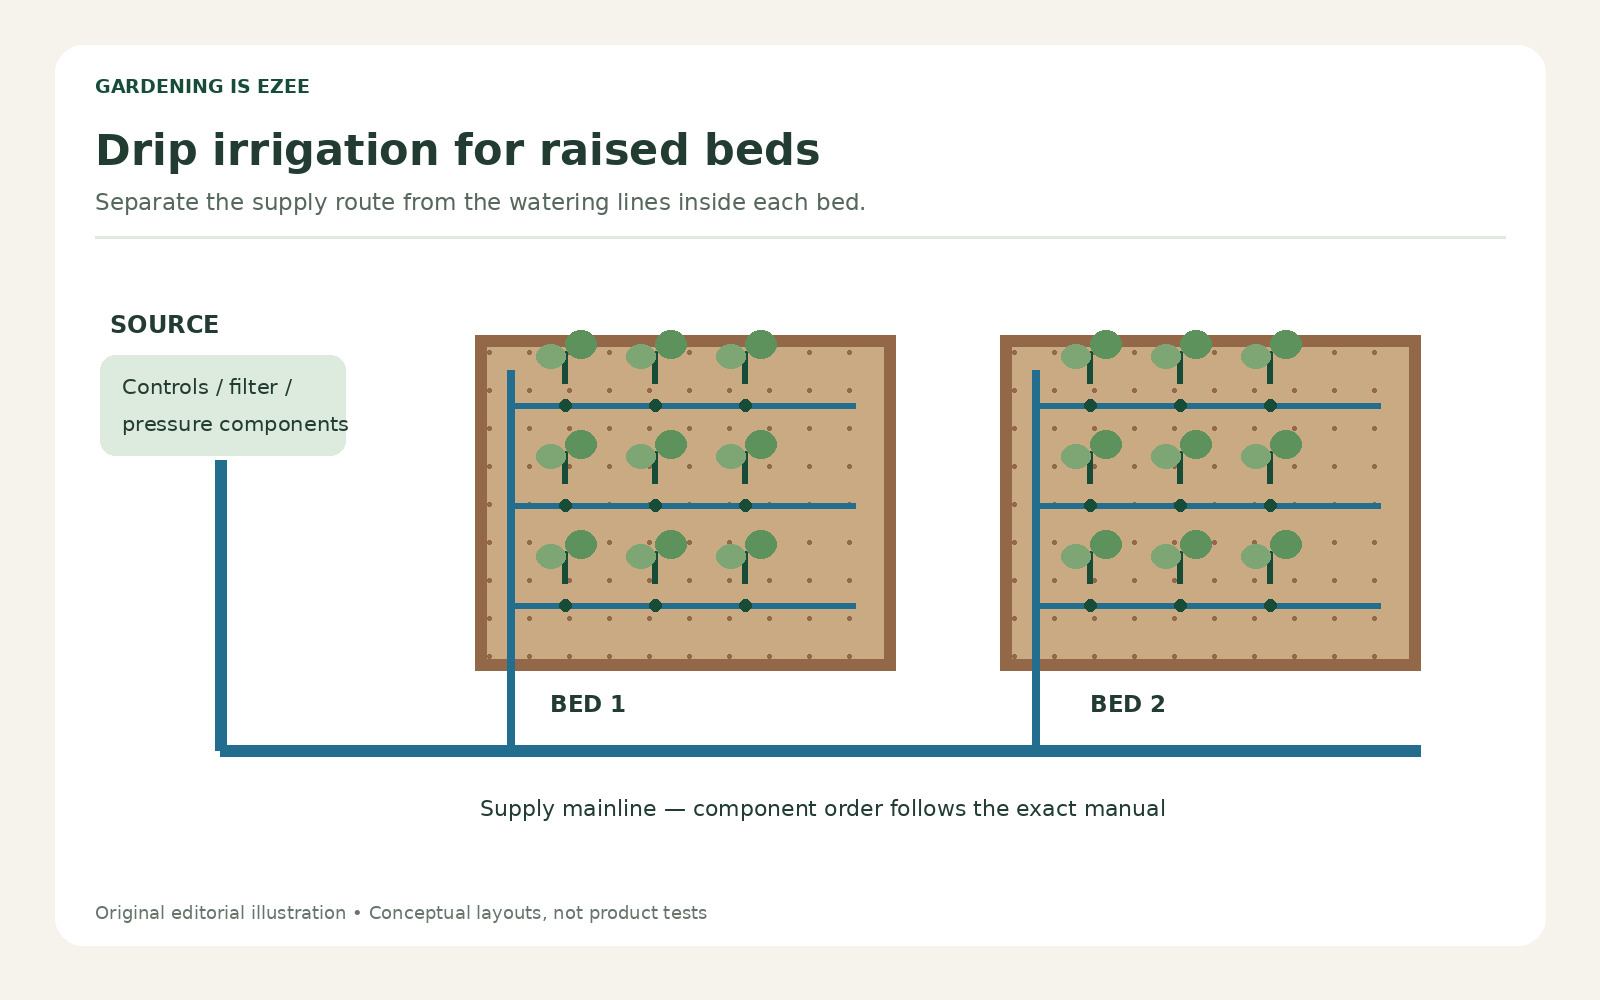
Illustration: Gardening Is Ezee. This conceptual layout does not specify emitter spacing or component order.
Step 1: draw the garden before buying parts

Raised vegetable beds arranged with accessible paths between growing areas. Photo: David Hawgood, CC BY-SA 2.0 via Wikimedia Commons.

Measure the faucet-to-bed route, each bed's internal dimensions, and the paths between beds. Include obstacles, changes in elevation, gates, and places where you need to walk or mow. Mark the direction in which you intend to plant rows.
Draw the supply route separately from the watering lines. Mainline tubing carries water between locations; emitter tubing or individual emitters release it inside the planting area. Keeping those roles separate prevents accidentally watering paths or building a long chain of small tubing that cannot supply the whole garden adequately.
Write the crop plan beside each bed. A bed of closely spaced greens needs a different coverage pattern from a bed with a few widely spaced plants. You can change crops later, but knowing the first planting helps you choose a flexible arrangement rather than an arbitrary tubing pattern.
Step 2: inspect the source and working conditions
Identify the water source: an outdoor faucet, a pumped supply, or a gravity-fed reservoir. Equipment designed for a pressurized faucet may not work from a rain barrel. Check the inlet conditions of every component, especially the timer and pressure regulator.
Measure available flow in a repeatable way if the product guidance calls for it. A known-volume container and a stopwatch provide a practical starting observation. Keep other water use consistent. If you also measure pressure, distinguish a static reading from conditions while water is flowing.
Look for support and clearance at the faucet. A heavy chain of timer, filter, adapters, and hose can load the connection awkwardly. Follow mounting instructions and arrange the setup so you can close the faucet, remove the timer, and clean the filter without dismantling the whole garden.
Step 3: choose inline tubing or individual emitters
Inline emitter tubing contains outlets at fixed intervals. It can be convenient for parallel rows and regularly planted beds. Individual emitters let you put outlets beside particular plants or containers. Some gardens use both, but different delivery types should be grouped only when their watering requirements are compatible.
Compare emitter flow and spacing with your planting arrangement. Do not assume the number of emitters in a box tells you the planted area it can serve. A line that matches one bed may leave gaps in a wider bed or waste outlets in an unplanted corner.
University of Georgia Extension's home vegetable garden drip guide explains the main system components. Use it to understand the roles, then use your selected kit manual for actual dimensions, connections, and limits. General advice does not override a product's maximum run length.
Step 4: create the parts list
| Component | Its job | What to check |
|---|---|---|
| Backflow protection | Helps protect the water supply | Required type and installation conditions |
| Timer, if used | Opens and closes the supply | Pressure range, outlet count, programming |
| Filter | Intercepts debris | Required filtration and cleaning access |
| Regulator | Controls downstream pressure | Suitability for emitter system and flow |
| Supply tubing | Moves water to beds | Size, length limits, matching fittings |
| Emitters or dripline | Delivers water to plants | Output, spacing, pressure requirements |
| Closures and flush points | Close and service branches | Approved method and access |
| Stakes and supports | Hold the layout in position | Fit, spacing, and avoidance of damage |
Inventory what the kit actually contains. An installation photograph may show a timer that is sold separately. Check the packing list, then add only the missing components. Buying a second set of incompatible fittings because the first list was vague is an avoidable expense.
Step 5: plan zones before adding more tubing
A zone is a group of watering lines operated together. Divide the garden if the combined flow exceeds system capacity or if beds need different watering schedules. A larger planted area does not become a suitable single zone merely by running it longer.
For a hypothetical setup with twenty emitters rated at half a gallon per hour, the nominal combined demand is ten gallons per hour at the specified conditions. That arithmetic helps describe demand, but it does not establish line sizing, pressure losses, or actual output. Follow the system's design limits.
Some packaged kits cannot be expanded freely. Rain Bird's raised-bed kit instructions provide an example of a kit with specific extension limits. Read the instructions for the exact version you buy; product names and contents can change.
Step 6: assemble the source connection correctly
Turn off the water before assembly. Check the thread type, washer position, and marked flow direction on each part. Start threaded connections by hand. If a fitting does not engage smoothly, stop rather than forcing it with a tool.
Install the source components in the manufacturer's required order. There is no single arrangement that safely replaces every manual. Backflow devices can have particular placement and pressure conditions, and local requirements may determine the protection needed for a permanent installation.
Do not add chemicals or fertilizer injection to a basic home watering system as an improvised upgrade. That changes the protection and management requirements. For this project, keep the installation focused on clean water delivery and obtain qualified advice for any more complex connection.
Step 7: route the mainline
Place the supply route along a accessible edge or path where it is less likely to be struck during digging. Avoid tight turns, unsupported spans, and places where a mower or gate can crush the line. Use supports approved for the tubing rather than staples or clamps that pinch it.
Leave practical access at junctions. A connector buried beneath dense roots or a fixed structure is difficult to inspect. If the route crosses a path, use the product's permitted protection method and preserve safe access for people working in the garden.
Do not cut all the tubing immediately. Lay out the route first, allowing the tubing to relax as the instructions suggest. Check the last bed, the corners, and the position of each branch. Small route changes are much easier before you have cut the mainline into pieces.
Step 8: install watering lines inside the beds
Run watering lines where roots will need water. For inline tubing, parallel runs can provide orderly coverage, but their spacing must suit the growing medium and planting pattern. For individual emitters, place outlets to wet the root zone rather than merely touching the plant stem.
Give transplanted plants attention during establishment. A line arranged for mature roots may not wet the original root ball adequately. Check that area directly. Do not assume a broad future root system makes today's small transplant independent of its initial planting pocket.
Keep tubing out of the way of routine weeding and harvesting where practical. Mark entry points and avoid fastening a line so tightly that repositioning it becomes difficult. Photograph the layout before mulching so you know where to avoid digging later.
Step 9: make connections with matching fittings
Use the tools and connection method described by the manufacturer. A clean, square cut can help a fitting seat properly, but required insertion depth and techniques vary. Do not heat tubing with an open flame or improvise a connection because it looks nearly compatible.
Nominal tubing sizes can be confusing across product families. Check actual compatibility, especially when adding replacement parts from another brand. A fitting that seems tight when dry may leak or separate once the system operates.
Keep a small set of correct spare fittings, closures, and plugs. Label the tubing family and emitter output. Repair is easier when the spare kit matches the installation rather than containing assorted parts collected from unrelated projects.
Step 10: flush before normal operation
Debris can enter during cutting and assembly. Follow the system instructions for flushing supply lines and branches before closing their ends or operating emitters. Open only the points designated for flushing, and keep the discharge controlled.
Observe the water and inspect connections while using a supervised first run. If a branch receives little water, check its route and connection before adding more runtime. A construction problem is easier to fix while the bed is still accessible.
Close the flush points securely using the approved method, then run the complete zone. Check the beginning and end of every line. A system that looks good near the faucet can still have poor delivery in the farthest bed.
Step 11: verify actual wetting
Watch the emitters, but also inspect the soil. After an initial cycle, check moisture near outlets and between lines with a small trowel, avoiding plant roots. Look for dry gaps, unusually wet pockets, and runoff outside the planted area.
Wait long enough for water to move into the growing medium before judging only the surface. The goal is a useful moisture pattern around roots. A wet surface line is not proof that the entire intended area has been watered.
Adjust placement first when the pattern is wrong. If water consistently misses part of the bed, extending runtime may deepen the wet zones without solving the dry gap. Change one variable, test again, and record the result so you know what improved the coverage.
Step 12: set a starting schedule from observations
Use the measured system output, bed condition, plants, and recent weather to choose a starting schedule. Treat it as a trial. Check the bed before the next cycle and revise the duration or frequency based on what you find.
Avoid a universal daily schedule copied from another garden. New seeds, established vegetables, different growing media, and seasonal weather do not have identical needs. A timer should automate a reasonable routine, not replace observation.
The University of Georgia irrigation start-up checklist reinforces the value of checking operating components at startup. Its larger-system examples should be scaled thoughtfully; a home bed still needs a clear inspection routine.
Step 13: add mulch after the trial works
Mulch can help protect the surface, but it also hides lines and leaks. Finish the initial inspection first. Apply appropriate mulch for the crop and growing conditions, keeping access to connections and flush points.
Photograph the bed again after mulching. Mark the supply entry and any controls so another household member can operate the system. A simple label can prevent accidental shutoff or digging through an unseen line.
Recheck delivery after the mulch is in place. Tubing can shift during spreading, and an outlet may become obstructed. The system should still be understandable and serviceable even when the watering lines are no longer obvious at a glance.
A two-bed planning example
Imagine two four-by-eight-foot beds separated by a path. The faucet is beside the first bed, and both beds contain rows of similar vegetables. Draw a supply line along the outside edge with a branch into each bed. Do not run emitter tubing across the path simply to connect them.
Choose a compatible system with enough capacity for both branches under its published limits. Decide how many watering runs each bed needs by testing the soil's wetting pattern. The bed dimensions alone do not establish a universal line count.
Operate each branch during inspection if the system allows separate control. Then operate the intended zone as a whole and confirm the farthest section still delivers properly. The second test matters because individual performance does not automatically prove simultaneous performance.
Troubleshooting common installation problems
One bed is dry while the other is wet
Check branch valves, pinches, fittings, outlet blockage, line length, and demand. Compare the dry bed when operated alone, if the design permits that test. If delivery improves alone, the combined layout may exceed capacity or need different zoning. Do not assume the dry bed simply needs a longer shared cycle.
Water sprays from a connection
Turn off the source and inspect the fitting. Check compatibility, insertion, damage, and pressure conditions. Replace the damaged part rather than wrapping an unsuitable joint with improvised tape. Run a supervised test after repair and inspect nearby connections that experienced the same conditions.
Emitters run but plants still wilt
Check moisture around the actual roots. Wilting has several possible causes and is not proof of dry soil. Verify placement and drainage before adding water. If the root zone is already wet, investigate the plant condition instead of lengthening the irrigation schedule automatically.
The timer opens but the system barely drips
Check source conditions, filters, regulators, and system demand. Test the supply and each component in the manual's recommended sequence. See Garden Hose Timer Not Working? for a separate timer diagnosis. Do not remove necessary filtration permanently to increase apparent flow.
Plan maintenance from the beginning
Keep the filter accessible and follow its cleaning instructions. Inspect after planting changes, repairs, and periods when the system has not been used. Walk the beds during an occasional complete cycle rather than relying only on the timer display.
Before freezing weather, follow the relevant winterization instructions. Rain Bird's winterization guide is a useful manufacturer example, but your components may require a different procedure. Avoid improvised high-pressure air flushing.
Store a diagram, parts list, and manual together. Add notes about the successful starting schedule and seasonal changes. That record makes the next year's setup easier and helps explain the system if someone else looks after the garden while you are away.
Before you buy a kit
Compare the real route with tubing supplied, confirm expansion limits, and check which source components are included. Review emitter output and spacing, not just the advertised number of plants. Choose a system you can inspect, repair, and expand within documented limits.
For alternatives, read Soaker Hose vs Drip Irrigation. For source control, compare watering timers. A successful installation is one that repeatedly wets the right soil areas and remains easy to maintain, not the one with the most fittings.
Commission the system before leaving it unattended
Commissioning means checking the complete working installation rather than only verifying that individual parts connect. Keep the first automatic cycle supervised. Observe the timer opening, the lines filling, the emitters operating, and the timer closing. Check the system again after shutdown for any continuing flow or unexpected drainage.
Inspect every bed, not just the one nearest the faucet. Write down three checkpoints for each bed: near the supply entry, near the middle, and near the far end. If one point looks different, investigate the physical layout before changing the shared schedule. A consistent inspection route makes it harder to overlook a small leak.
Confirm that the timer program you intended was saved. A temporary manual duration is not necessarily the automatic duration. Check days, start time, outlet, and any delay function. Photograph the final settings and remove temporary testing programs so they cannot trigger unexpected watering later.
After the first successful cycle, inspect soil moisture rather than assuming emitter operation proves useful coverage. Check near plants and between watering lines. Record where the system performs well and where placement needs adjustment. This observation becomes the starting reference for later weather and crop changes.
Before travel, repeat a supervised cycle after any recent modification. Replacing an emitter, moving a pot, or adding mulch can change delivery. Give the person checking the garden a simple shutoff instruction and an inspection map. They should not need to understand every fitting to recognize a leak or a dry branch.
Keep a parts record that makes repairs easier
Create a small document with the kit model, tubing family, emitter type, rated output, fitting identifiers, and source components. Add photographs of the faucet arrangement and each bed before mulch hides the lines. Keep the original manual with the record.
A parts record prevents a common shopping mistake: buying a connector with the right-looking nominal size but incompatible dimensions. When you need a replacement, compare against the documented part family. If you change a component, update the record instead of leaving two competing descriptions of the system.
Label spare emitters by output. An unmarked collection of similar-looking outlets can make later repairs inconsistent. A replacement that fits physically may deliver a different amount of water. Record whether the installation uses fixed-output or adjustable emitters so you know what must be checked after replacement.
Track changes in a simple dated list. Bed two was planted differently; one lateral was moved; the filter was cleaned; the schedule was shortened after rain. These notes help explain later observations. They do not need to become an elaborate maintenance database to be useful.
Reserve a few matching repair parts that solve likely minor problems. You may need an approved closure, compatible connector, or plug for the tubing system. Avoid buying a huge miscellaneous kit unless its parts actually match. A small correct kit is easier to use than a large collection of uncertain components.
At the end of the season, record which arrangement worked for each crop. Do not treat the schedule as permanent, but preserve the observations that made it reasonable. Next season you can start with a known layout, test the new planting, and revise deliberately rather than reconstructing the project from memory.
Design an easy shutoff and handover routine
Every small garden system should have an obvious way to stop the water. Identify the source shutoff and make sure it remains accessible after the timer, filter, and tubing are installed. Do not cover it with storage, a fixed planter, or a decorative enclosure that makes an urgent leak harder to control.
Label the zones in language that matches the garden. Front vegetable bed is easier for a helper to understand than outlet two if the outlet numbering is not visible. Keep the timer settings photograph and a simple bed diagram together. Include the source shutoff and the branch controls that a helper may legitimately use.
Write a short inspection routine: look at the source connections, check the named beds during a cycle, and close the source if a fitting separates or water runs where it should not. The helper does not need to diagnose the entire system while you are away. They need to recognize the problem and know the appropriate first action.
Arrange a hand-watering fallback before travel. A compatible hose or watering can can cover a temporary fault while you decide what repair is needed. Keep the tool accessible and explain which plants require attention. This is more practical than asking someone unfamiliar with the installation to rebuild it immediately.
After any handover period, review what happened. Did the helper find a dry corner, confusing label, or awkward connection? Improve those details while the observations are fresh. A system that another person can inspect and shut off is easier to maintain even when you are the only regular gardener.
Sources and further reading
- University of Georgia: Drip Irrigation in the Home Vegetable Garden.
- University of Georgia: Drip Irrigation Checklist — Start-Up.
- Rain Bird: Raised Bed Garden Kit support.
- Rain Bird: Raised Bed Garden Kit installation manual.
- Rain Bird: Winterize Your Drip Irrigation.
Editorial method: This is an original installation-planning guide with hypothetical examples. Specifications and assembly instructions must come from the exact system manual. No hands-on product testing is claimed.